
To configure advanced settings:
In the Initialize eToken window click Advanced.
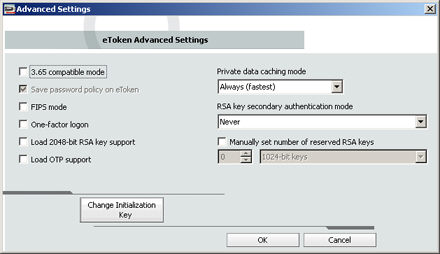
The eToken Advanced Settings window opens.
Complete the fields as follows:
|
Field |
Description |
|
3.65 compatible mode |
Select to maintain compatibility with eToken RTE 3.65. |
|
Save password policy on eToken |
Select to keep password policy on the eToken device. |
|
FIPS mode |
Select to enable FIPS support. FIPS (Federal Information Processing Standards) is a US government approved set of standards designed to improve the utilization and management of computer and related telecommunication systems. The eToken PRO can be configured in FIPS mode. |
|
One-factor logon |
Default: disabled. When one factor logon is enabled, only the presence of the eToken is required to log on to applications. A password is not required. Note: For security reasons, one-factor logon is not applied to eToken PKI Client Properties. |
|
Load 2048-bit RSA key support |
Select to enable 2048-bit RSA key support (on compatible token). |
|
Load OTP |
Select to enable OTP support (on compatible token). |
|
Private data caching mode |
In PKI Client, public information stored on the eToken is cached to enhance performance. This option defines when private information (excluding private keys on the eToken PRO / NG OTP / Smartcard) can be cached outside the eToken. Select one of the following options:
|
|
RSA key secondary authentication mode |
An authentication password may be set for an RSA key. If this option is used, then in addition to having the eToken and knowing the eToken's password, accessing the RSA key requires knowing the password set for that particular key. This option defines the policy for using this secondary authentication of RSA keys.
|
|
Manually set number of reserved RSA keys |
Set the number of reserved RSA keys to reserve space in the token memory. This ensures that there will always be memory available for the keys. |
|
Change Initialization Key |
The initialization key protects against accidental initialization and requires a separate password to be entered before initialization can occur. |
If you want to change the eToken initialization key see Changing the eToken Initialization Key, else, click OK to return to the Initialize eToken window.
Click Start.
When the initialization process is complete, a confirmation message is displayed.
Changing the eToken Initialization Key
|
eToken PKI Client © Copyright 2009 Aladdin Knowledge Systems, Ltd. All rights reserved. |
|
![]()