This module is designed for setting the DHCP (Dynamic Host Configuration Protocol). The DHCP service provides centralized management of IP addresses and standard TCP/IP parameters. If you have a DHCP server set up on your network, you can assign dynamic IP addresses for any computer network interface. A DHCP server also automates the management of other TCP/IP parameters.
When setting up a new DHCP server, it is automatically provided
with parameters optimal for the current network environment.
DHCP management is done by clicking the Add button in the
UserGate Control Panel. ( Illustration).
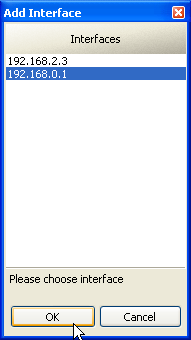
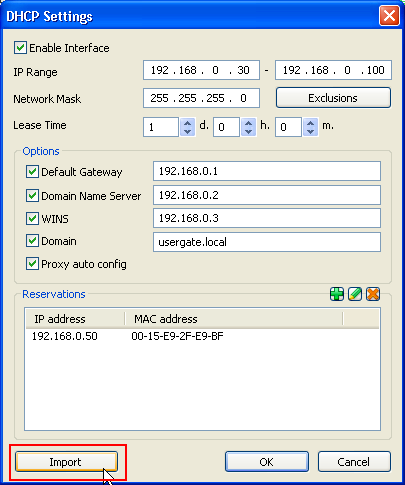
Select the interface, which should be used for passing data to
DHCP clients. ( Illustration).
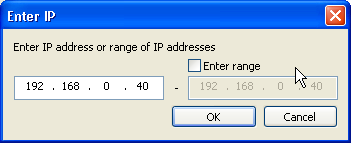
Then you should set up the IP Range in which DHCP should assign
client IP addresses when leasing and reserving, as well as the
subnet mask. ( Illustration).
Note: If you already have a DHCP server working on your network, be sure that this new IP range doesn't conflict (intersect) with the range(s) used by your other DHCP server(s).
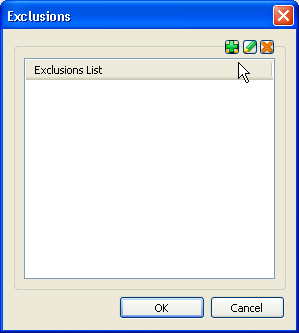
Using the "Exclusions" button, specify the IP address or IP
range you want to exclude from being assigned by the DHCP server.
( Illustration).
Specify the lease time for the IP addresses.
Note: If you specify too long a lease time, it may decrease DHCP efficiency and could result in running out of available IP addresses. This is especially important when there are many users that are not permanent clients. For most networks, the optimum lease time is 1 to 3 days.
As your default gateway, specify the IP address of the computer working as a proxy, the one that has UserGate running on it.
If you use DNS and WINS on your network, specify the IP addresses of the DNS server, the WINS server and the parent domain name.
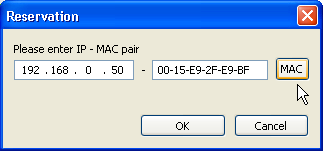
The purpose of reserving is so a specific PC can have a particular IP address. It is based on the network interface's MAC address.
To add reserving, press the icon that looks like this: ![]() Enter the IP address of the computer and press the
MAC button to automatically get a MAC address of the specified IP.
( Illustration).
Enter the IP address of the computer and press the
MAC button to automatically get a MAC address of the specified IP.
( Illustration).
Usergate DHCP server supports Web Proxy Auto Discovery (WPAD)
technology which helps to configure network hosts to work through
Usergate proxies. This function could be enabled through Proxy
auto config option in DHCP server settings dialog ( Illustration).
To work with WPAD you should:
- Edit wpad.dat file, located in %Usergate%\wwwroot folder, and
specify correct proxy parameters (IP address: port) for each
protocol: HTTP, HTTPS, FTP etc.
- Enable proxy auto discovery in users web browser ( Illustration).
Attention! Each web-browser has its own peculiarities of
WPAD implementation. For example, Mozilla Firefox prefers WPAD
through DNS.
In wpad.dat file you should specify HTTP response header of
Usergate Web server and proxy servers parameters using
JavaScript:
HTTP/1.1 200 OK
Server: Usergate 4.3
Content-Length: 405
Content-Type: application/x-ns-proxy-autoconfig


function FindProxyForURL(url, host)
{
   if (isInNet(host, "192.168.0.0", "255.255.255.0")) {
	return "DIRECT";
   } else {
	if (shExpMatch(url, "http:*"))
		 return "PROXY 192.168.0.1:8080";
	if (shExpMatch(url, "https:*"))
		 return "PROXY 192.168.0.1:8080";
	if (shExpMatch(url, "ftp:*"))
		 return "PROXY 192.168.0.1:8080";
	return "DIRECT";
   }
}
In order to simplify the process of WPAD configuration there is a
template wpad.dat file in %Usergate%\wwwroot folder. You should
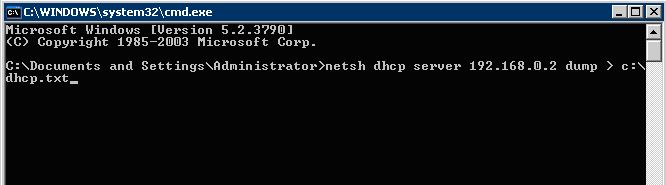
only specify correct IP addresses and ports.Usergate DHCP server can use Windows DHCP server settings. To
transfer these settings you should dump Windows DHCP server
settings into a text file. To do this open command console on a
Windows DHCP server (Fig. 5) and run a command: netsh dhcp
server [IP] > c:\dhcp.txt ( Illustration).
In Usergate DHCP server settings dialog press Import button and
select a corresponding file ( Illustration).
After creating and configuring Usergate DHCP server the issued
IP addresses will be displayed on Services DHCP page. The
issued IP addresses can be used to automatically create a
corresponding user in Usergate. To do this, highlight the desired
IP address from the list and select Add user in context
menu. If the user with this IP or MAC address already exists in
Usergate, you will be asked to edit an existing user. ( Illustration).
 icon. The need for releasing of the
issued IP address can occur, for example, if the computer is no
longer present in the LAN
icon. The need for releasing of the
issued IP address can occur, for example, if the computer is no
longer present in the LAN